77162-009-51 Mounting Levers for PanelView Plus 400 and 600
group nameAllen Bradley touch screen repair
-
Min Order1 piece
brand nameVICPAS
model77162-009-51
payment methodWestern Union, MoneyGram, T/T, Paypal, PayPal, Credit Card
-
update timeTue, 05 Nov 2024 13:47:53 GMT
Paramtents
Brand Allen Bradley
Warranty 365 Days
Product Line Mounting Levers
Supply 77162-009-51 Mounting Levers
Parts 77162-009-51 Mounting Rods
Packging & Delivery
Min Order1 piece
Briefing
Detailed
77162-009-51 Mounting Levers for PanelView Plus 400 and 600 Terminal Repair Replacement

VICPAS supply 77162-009-51 Mounting Levers for repair replacement, make the HMI running. We provide a 365 days VICPAS warranty of the most product, which include most of touch screen panel, membrane keypad, LCD display and protective case shell housing.
The Allen Bradley 77162-009-51 Mounting Levers is a high-quality product designed specifically for industrial automation equipment. This mounting rod features a robust structure and high durability, capable of long-term use in harsh industrial environments. Its black design is not only aesthetically pleasing but also provides strong corrosion resistance and oxidation protection, ensuring the equipment operates normally under various complex conditions.
This mounting rod is specifically designed for the installation and securing of the 2711P series panel displays. Its precise dimensions and sturdy material ensure the stability of the display, preventing any wobbling or displacement during use. This not only enhances operational reliability but also reduces the frequency of equipment maintenance, thereby saving time and costs.
In addition to its excellent functionality, the Allen Bradley 77162-009-51 Mounting Levers is also very easy to install. Users can quickly complete the installation and setup by following the instructions. Whether in the assembly of new equipment or the upgrade and modification of existing equipment, this mounting rod is an ideal choice, significantly improving work efficiency and overall equipment performance.
Related Allen Bradley Mounting Levers Mounting Clips Series Part No. :
| Mounting Levers | Description | Inventory status |
| 2711-NP2 | Mounting Clips for Allen-Bradley PanelView Plus 700 to 1500 Terminal | Available Now |
| 2711P-RMCP | Mounting levers for PanelView 5310, 5500, 5510, and PanelView Plus 7 Performance | In Stock |
| 2711P-RMCS | Allen Bradley PanelView Plus 7 Standard Terminals Mounting Levers | In Stock |
| 2711P-RTFC | Replacement Mounting Levers for PanelView Plus 400 and 600 Terminals | In Stock |
| 2711P-RTMC | Replacement Mounting Clips for PanelView Plus 700 to 1500 Terminals | Available Now |
| 77158-008-51 | Mounting Clips for PanelView Plus 700 to 1500 Terminals Replacement | In Stock |
| 77158-008-52 | Mounting Clips for PanelView Plus 700, 1000, 1250, 1500 Terminals | Available Now |
| 77158-008-53 | Allen-Bradley PanelView Plus 700, 1000, 1250, 1500 Mounting Clips | In Stock |
| 77162-009-51 | Mounting Levers for PanelView Plus 400 and 600 Terminals Replacement | In Stock |
| Mounting Clips | Description | Inventory status |
Allen Bradley Mounting Levers Mounting Clips Manuals PDF Download:
FAQ:
Question: What are the 77162-009-51 mounting levers price?
Answer: Submit a fast quote, send VICPAS an email for best price.
Question: Mount the 400 or 600 Terminal in a Panel
Solution: Mounting levers secure the terminal to the panel. The number of levers you use (4 or 6) varies by terminal type.

Follow these steps to mount the 400 or 600 terminals in a panel.
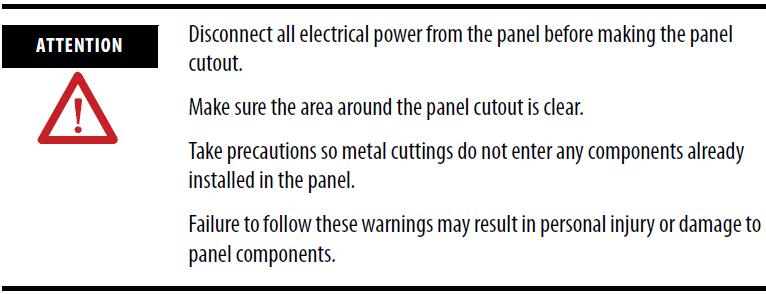
1. Cut an opening in the panel by using the panel cutout shipped with the terminal.
2. If a communication module is ordered separately, attach the module to the base unit before panel installation.
Refer to the instructions shipped with module.
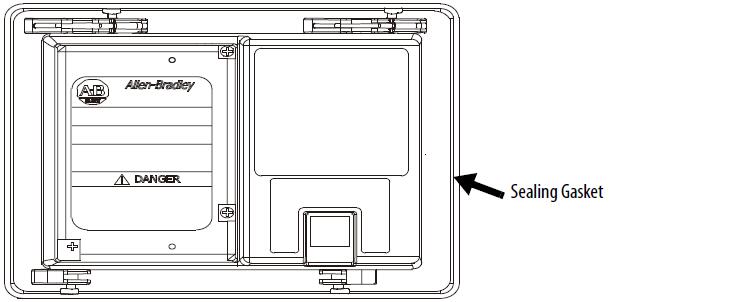
3. Make sure the terminal sealing gasket is properly positioned on the terminal.
This gasket forms a compression-type seal. Do not use sealing compounds.

4. Install legend strips before installing the terminal if you are using keypad legend strips on a 600 keypad terminal.
Be careful not to pinch legend strip during installation.
5. Place the terminal in the panel cutout.
If installing the terminal in an existing 550 panel cutout, align the terminal with the center of the cutout for best gasket sealing.
6. Insert all mounting levers into the mounting slots on the terminal.
Slide each lever until the flat side of the lever touches the surface of the panel.

7. When all levers are in place, slide each lever an additional notch or two until you hear a click.
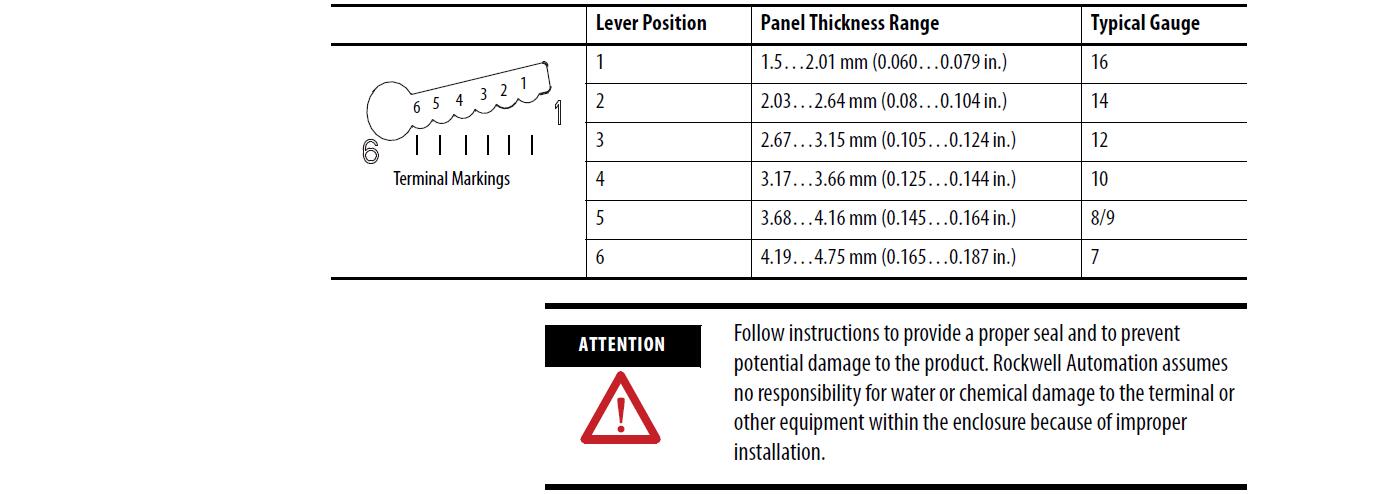
8. Rotate each lever in the direction indicated until it is in the final latch position.
Follow the latching sequence for the optimum terminal fit.

Use this table as a guide to provide an adequate gasket seal between the
terminal and the panel.

Common misspellings:
77162-009-1
77162-09-51
77162-00-951
7716Z-009-51
77162--009-51
You need a product
You May Like
- Nearest port for product export
- Guangzhou, Hongknog, Shenzhen, Taiwan
- Delivery clauses under the trade mode
- FOB, CFR, CIF, EXW, FAS, CIP, FCA, CPT, DEQ, DDP, DDU, Express Delivery, DAF, DES
- Acceptable payment methods
- T/T, L/C, D/P D/A, MoneyGram, Credit Card, PayPal, Westem Union, Cash, Escrow


